Ooo, thats good I thought. I'll make one. So I purchased some of the stuff to make this small charcoal fired forge, then remembered I was an electronics engineer and thought why am I not making an electric one? I pondered this for a while and then thought why am I not building an induction heated forge. So thats what I have started doing....
Induction heating involves inducing eddy currents in the work piece. These currents are big, so the work piece heats up.
Wikipedia has the explanation here https://en.wikipedia.org/wiki/Induction_heating
The output stage of this heater will probably connect to rectified mains so I would like all the control electronics isolated from this. I started with what I had 'in the drawer' to construct an oscillator and gate drive transformer driver. The IR2153 is a self oscillating half bridge driver, so sounded ideal for what I was trying out.
 |
| IR2153 Half Bridge |
Out of curiosity I connected this...
...to the output of the driver via a 1uF Cap. Using a 'scope I could tune the IR2153 to get the coil resonating. This was able to heat my screwdriver up to above 100°C, I know this because my finger sizzled when I touched it.
From initial measurements on the above coil of wire I could tell the final coil would be conducting 100's of amps, so water cooling would be a good idea. I got some 8mm copper tubing and found a paint tin to wrap it around. I couldn't just wrap the tube around the tin, it would buckle at the first bend, so I perused the WWW and plenty of people suggested filling the tube with salt. This I did and the tube bent very nicely...
...Getting that salt out was difficult and took ages, tap tap tap, rotate, tap tap tap, rotate, Zzzzz
I tried buzzing it out with a sander and all sorts.
I needed a smaller coil. I wasn't going to use the salt method again. Water doesn't compress, so I capped one end of tube with a compression fit stop end, filled the tube with water and capped the remaining end. The tube requires a slight tweak to take up any air that got in, but after that the tube wrapped up into a coil nicely. Getting the water out was easy, just release the compression fittings and empty the water out. Using the compression fittings 'wastes' a couple of olives and some tube but saves a lot of time.
The coil gets hot without cooling, so I purchased a water CPU cooler from ebay. It was 'untested', but after cleaning it out, removing pipework and re-piping it to the coil, it pumped water round no problem.
The pump and cooling fan required an extra 12V supply, the pump at 200mA and the fan at 1.5A. I decided to under run the pump and fan at 10V and constructed a 2A buck regulator from a TL494 and associated components.
The heater as it was built was getting hard to work on so I put the lot into a metal enclosure..
I am planning on adding a 'wall' down the middle of the box to separate the electronics from the half that has water pumping round it, just in case :)
To test a theory about using Litz wire for the work coil I obtained some of these...
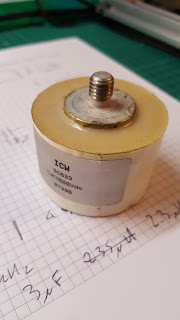
1uF, 1500V Polypropylene capacitors. Manufactured by ICW Ltd. I bolted three together to make 3uF...
Very nice.


No comments:
Post a Comment