Monday, 4 December 2023

Radiation Detector

 Radiation Detector With Geiger Muller Tube

For ages I have wanted to build a radiation detector using a Geiger Muller tube.  No real reason, just wanted to build one.  I purchased a tube from ebay and set about designing the detector.  The only design goals where it had to run from a single cell (1.5V) and be built from what I had.

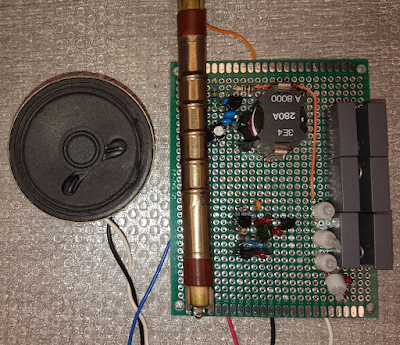
The left hand side of the diagram is all power supply.  It generates about 380V from the 1.5V cell.  It draws around 2mA from the cell.

TR1 has three windings.  About 1500 turns form its secondary, 12 turns each for primary and feedback.  The output is trippled and regulated by feedback through the neon bulbs.  The 'neon bulbs' I have aren't neon because they glow green due to a phosphor coating, probably emitting UV.  Ideally these 'neons' would be zener diodes, but I don't have any with a high voltage knee.

The pulse duration from the tube is extended by Q4 & Q3 to provide a good 'click' from the speaker.  The speaker I used has a coil resistance of 45 Ohms.

All transistors are BC550C and BC560C, these have quite a high gain and substitutions with a lower gain device may need some tweaking.

Here it is built...

Geiger counter circuit


It doesn't have a CPM meter yet, that will come later.


Monday, 20 November 2023

High Input Impedance & Voltage Buffer

 High Voltage & Impedance Buffer


I am finally designing a Geiger counter, which requires some high voltage of about 300V.  This voltage has a fairly high source impedance and measuring it with a normal digital volt meter is enough to drag the voltage down.


I need a high input impedance buffer that can handle the few hundred volts I want to measure, so built this...


It has above 1Gigaohm input impedance and outputs 1V per 1kV input.  Runs off a 9V battery.  One half of the TL082 op-amp works as an oscillator and produces its own negative supply.  R6 can be adjusted to better the output accuracy.

Monday, 10 July 2023

Crystal Radio

 Crystal Radio

When I was a lad, I used to build radios.  So I thought I would try and get the kids doing something else for 15 minutes that didn't involve those Vidiots on youtube.

A crystal radio

You will often find diagrams on the internet using a single coil, paralleled with the tuning capacitor, directly connected to the detection diode and then earpiece.  Although this will work, there will be very little selectivity in the tuning, since nothing will be impedance matched.  The diagram of the radio I built is this...


And here is a quick description of each stage...

L1, L2 & L3 are wound on separate cardboard formers which can be moved up and down independently on a ferrite rod.

L1 is 20 turns, L2 is 40 turns and L3 is also 40 turns.

C1 is a 500pF air cored variable capacitor.  In the picture it is ganged with other various capacitors, but it was the first one out the junk box that looked any good.  You will notice one end of this is also earthed.  This is because the capacitor has a metal frame and tuning shaft.  It is this frame which is earthed to prevent my hand changing the resonant frequency of this part of the circuit while tuning.

D1 is an OA91 germanium diode, again out of the junk box.  This diode must be a germanium diode, silicone diodes wont work.  I have heard tale of Schottky diodes working here, but have yet to try it.

R1 is 100k.  This is included here because the earpiece (SPK) I have is quite capacitive and so needs somewhere for the charge within it to dissipate.  The earpiece is a high impedance ceramic type.  The high impedance is important since there is very little energy available to drive any sort of passive load.

Some diagrams will include a capacitor across R1 to filter out the RF, but like I said, my earpiece is capacitive enough to do this job.

The aerial (ANT) was about 15 Meters of cable running from an upstairs window in the house to a tree opposite.  The earth connection was to a copper radiator pipe.  Many modern central heating systems are piped with plastic tubing, so this wouldn't work with those.

I initially had a 2 Meter metal stake hammered into the grass outside to provide the earth, forgetting that underneath the top foot of soil was just rubble and hardcore, not a good earth and not a good reception.

The tuning range of the radio was about 500kHz to 1.2MHz and me and the lad could tune in a couple of stations.  There are another couple just above 1.2MHz so I'll have to do some adjustments to get them.

Selectivity of tuning was very good.  The positions of L1, L2 & L3 on the ferrite rod didn't matter too much, as long as L1 was close to the other two windings.  I will experiment a bit more with turns ratio but the next step will be tuning in those missing stations.

Obviously my son wanted it louder so we will probably be building an amplifier as well.  This will need a battery.  It is at this point I explained our radio didn't currently use any form of local power supply and the energy came out of the sky, that boggled his mind.


Monday, 19 October 2020

Factory Reset A Citaq H10

 So, I had one of these Citaq H10 EPOS Machines...


Unfortunately it was locked and stuck with the 'Just Eat' POS software.
This machine runs android and on taking the back off there is a button marked 'recover'.  Pressing this and resetting the unit gets the usual android recovery menu, but the unit has no volume up / down buttons to navigate the menu.

The processor inside the unit is a Rockchip RK3368.  On their website is an example circuit of how to use this chip.  It is very similar to the EPOS unit!
This bit...
...shows the recover button is read by an A/D converter and checking the linux device tree file (from the github repository for the RK3368 evaluation board) we find ADC values corresponding to the different buttons which can be on this pin....

Volume Up - 1
Volume Down - 170
Menu Key - 355
Home key - 746
Back key - 560
Camera key - 450

So I tacked wire across the recover switch which led to the outside of the unit...


The voltage across these wires measures 1.8V and is pulled up via a 10K resistor, like the schematic shows.
The ADC inside this chip is 10 bits so to get a value of 170 (Volume down) I need a resistor to pull the ADC pin down to 0.3V ( ((1.8V / 1023) * 170) = 0.299V )

A 2k resistor will do this, so booting into the recovery menu and using the 2k resistor to move the menu down to 'factory reset' and then selecting, does a factory reset :)

After rebooting, the unit boots into android with no Just Eat !


After installing YouTube from the Play Store...


I don't know if there was a software way of doing this, but now I can add volume buttons to the EPOS unit.  I can't get the printer to work yet, since it is a serial printer and doesn't expose its self to the android OS as a printer.


Thursday, 24 September 2020

Replacement bandsaw switch

 So, I switches on my bandsaw and BANG! This thing...


explodes.  Inspecting the switch reveals it had shorted out.  Googling around provided plenty of replacements at cheap prices.  The replacement switches were all of a similar quality, so if I replaced like for like, is it going to go BANG! again in a few months?


So I'm not replacing like for like.  I designed a simple push button operated relay which requires a long, one second push to switch on the saw and any push, while the saw is on, will switch it off.

I initially disregarded a microcontroller for this simple task and came up with...


Powered directly off mains supply using a capacitive dropper.  It was going back in the saw so the circuit was going to be encased safely.

Works fine if your supply voltage comes up quickly, doesn't work so well if the supply is slow.  So it would require various reset circuitry adding etc, etc... Sometimes its just easier to go with a £0.50 microcontroller from the start.  It simplified down to this...


Works great.  Now that ATtiny44 is in there I think I might make it periodically 'beep' while the mains is on, to remind me to switch it off at the plug.  I used an ATtiny44 because that's what I had in the drawer.

Here it is working...


Thursday, 12 December 2019

Box full of lights and buttons (or simon says)

A box full of lights and buttons...


The little lad wanted a box with lights and buttons, so I got some from fleabay for arcade machines.  They were cheap and I was surprised how good the quality of them is.  Each button has a microswitch on the back and an integrated LED with current limit resistor.  Looks like the LED's are set up for 12V operation, they work fine at 9V.

I was going to charlieplex the lot but the processor I was going to use had tonnes of IO so I just wired each switch to a pin and wired each LED to a transistor to a pin.


I used darlington drivers to switch the LED's 'cos I had them and it makes building the board a bit easier.


That's it really, simples!

Saturday, 30 March 2019

IR Remote Control Pop Tin Car

IR Remote Control Pop Tin Car

When I was at school I remember building something like this...


Two cans suspended on a frame driven by a motor and a rubber band.  The kids like making stuff and
drilling holes in wood, so we made this one weekend.  It didn't survive long because once its trundled underneath the sofa and distractions happen, the batterys go flat quickly driving into a stalled motor.  So, more for my enjoyment, I added remote control using an old IR remote.

Now it can go in TWO whole directions, forwards and back under control of the IR Remote.
It also shuts down into low power mode after some time of inactivity.

Schematic of IR Receiver and Motor driver.

The motor is driven by an H Bridge with the load in the collector of the transistors to minimise volt drop.  Each of the H bridge transistors is controlled by the ATtiny44 microcontroller.  The micro and the bridge must be powered from the same supply as there is no level shifting done.

This was built out of junk I had in the box so the power supply to the IR receivier isn't ideal.  The receiver I had shut down below about 4.5V, so to make the most of the battery, the supply is doubled and regulated back down to 5V via that LDO regulator.

Here it is in full action....